目标:
- k8s各资源对象及实践
- 运用k8s各项调度策略
- 掌握k8s网络原理及应用
- 掌握pod控制器及运用
- 掌握k8s微服务DevOps实践
kubernetes简介
Google开源的容器集群管理系统,主要功能:
- 基于容器的应用部署、维护、滚动升级
- 负载均衡,服务发现
- 跨机器和跨地区的集群调度
- 自动伸缩
- 无状态服务和有状态服务
- 广泛的volume支持
- 插件机制保证扩展性
创建第一个k8s Pod
https://blog.csdn.net/pcj_888/article/details/144200265
创建k8s集群
https://blog.csdn.net/pcj_888/article/details/144240636
kubernete核心组件
一个k8s集群由分布式存储etcd, 控制节点controller,和服务节点Node组成,k8s主要组件如下:
- etcd保存整个集群状态
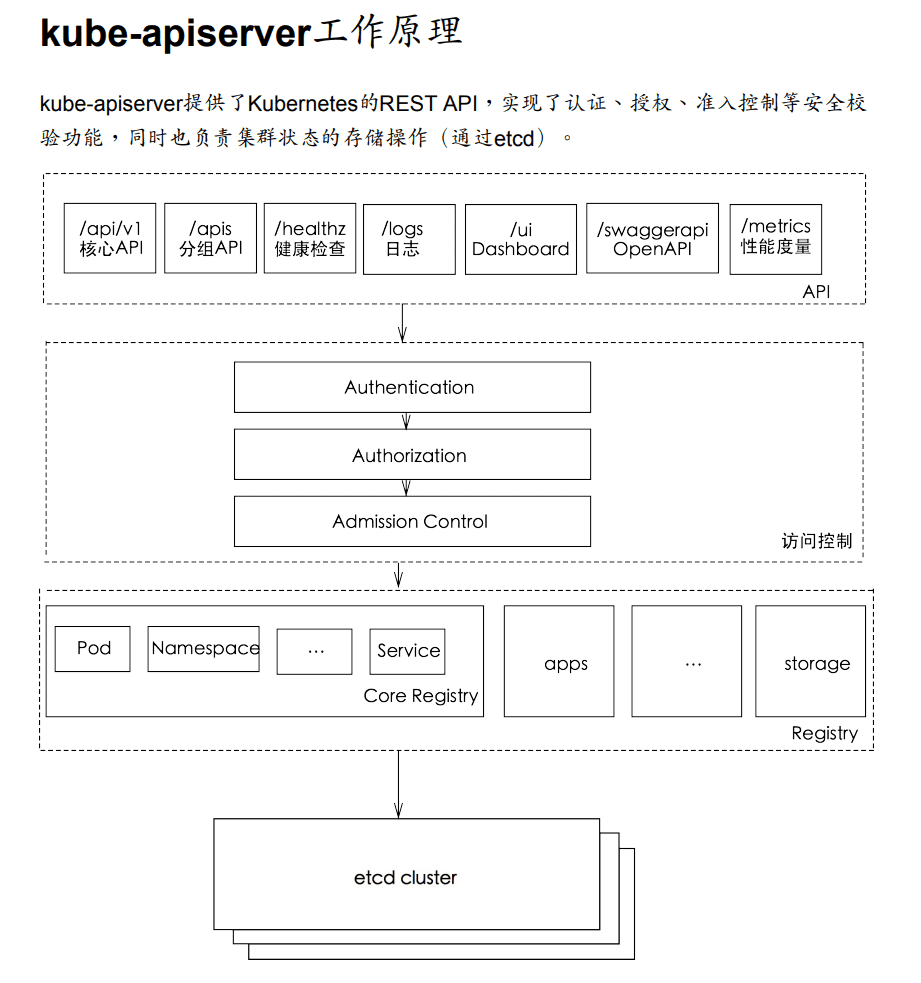
- apiserver提供资源操作唯一入口,提供认证、授权、访问控制、API注册和发现等机制
- controller manager负责维护集群状态,如故障检测、自动扩展、滚动更新
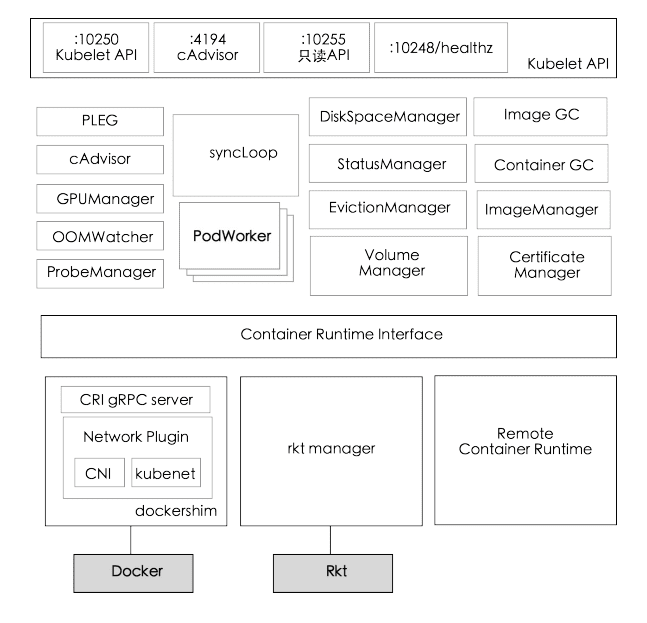
- kubelet负责维护容器生命周期,同时负责Volume和网络(CNI)管理
- kube-proxy负责为Service提供cluster内部的服务发现和负载均衡
![k8s-architecture.png]()
插件Add-ons
- kube-dns负责为整个集群提供dns服务
- ingress controller为服务提供外网入口
- fluentd-elasticsearch提供集群日志采集、存储与查询
- dashboard提供GUI
组件通信
![image1.png]()
kubenetes基本概念
Pod
Pod是一组紧密关联的容器, 是k8s调度的基本单位
Pod设计理念是支持多个容器在一个Pod中共享网络和文件系统,可通过进程间通信和文件共享的方式完成服务
Node
Node是Pod真正运行的主机。为了管理Pod,每个Node上至少要运行container runtime、kubelet和kube-proxy
Namespace
Namespace提供一种机制,将同一集群的资源划分为相互隔离的组
pod,service,deploymeny都是属于某一个namespace的,而node,persistentVolume不属于任何namespace
Service
Service是应用服务的抽象,通过labels为应用提供负载均衡和服务发现。
匹配labels的Pod IP和端口列表组成endpoints, 由kube-proxy负责将服务IP负载均衡到这些endpoints上
声明式API
相对于命令式API, 声明式API对于重复操作的效果是稳定的,运行多次也不会出错
Deployment
Deployment(部署)表示用户对k8s集群的一次更新操作。 可以是创建一个服务,更新一个服务,或者是滚动升级一个服务
Service
Pod只是运行服务的实例,随时可能在一个节点停止,在另一个节点以新的IP启动,因此不能以确定IP和端口提供服务。
Service实现了服务发现和负载均衡的核心功能。
- 每个Service对应一个集群内有效的虚拟IP,集群内部通过虚拟IP访问一个服务
- k8s集群中微服务的负载均衡由kube-proxy实现。kube-proxy是一个分布式代理服务器,每个服务节点都有一个
DaemonSet
业务Pod可能在有些节点运行多个Pod, 有些节点又没有Pod运行。而DaemonSet保证每个节点上都要有一个Pod运行。
典型的DaemonSet包括: 日志、监控(比如fluentd)
StatefulSet
StatefulSet是管理一组有状态pod的部署和扩展的控制器。
Volume
k8s的volume(存储卷)和Docker的类似。Docker的volume作用范围为一个容器,k8s的volume作用范围是一个Pod
每个Pod中声明的存储卷由Pod中所有容器共享
PV(Persistent Volume)和PVC(Persistent Volume Claim)
PV和PVC的关系,和Node与Pod关系类似
Secret
Secret用于保存和传递密码、秘钥、认证凭证等敏感信息
环境变量
ImagePullPolicy
- Always: 不管镜像是否存在都拉取
- Never: 不管镜像是否存在都不会进行拉取
- IfNotPresent:默认值,只有镜像不存在时,才会进行镜像拉取
注:
- 默认为IfNotPresent, 但:latest标签镜像默认为Always
- 生产环境要避免使用:latest标签,开发环境可借助:latest自动拉取最新镜像
访问DNS的策略
https://juejin.cn/post/6844903665879220231
通过设置dnsPolicy参数,设置访问DNS的策略。默认为ClusterFirst
- ClusterFirst
- ClusterFirstHostNet
- Default
- None
** ClusterFirst**
默认值, 优先使用kubedns或coredns解析,如果不成功使用宿主机DNS解析
有一个冲突,如果Pod设置了HostNetwork=true, ClusterFirst会强制转换为Default
Default
表示Pod里DNS配置和宿主机完全一致(/etc/resolv.conf完全一致)
ClusterFirstWithHostNet
Pod以host模式启动时,会使用宿主机的/etc/resolv.conf配置
如果Pod中仍然需要用k8s集群的DNS服务,需要将dnsPolicy设置为ClusterFirstWithHostNet
None
清除Pod预设的DNS配置。如果设置为None,为了避免Pod里没有任何DNS,需要添加dnsConfig描述自定义的DNS参数,例:
1
2
3
4
5
6
7
8
9
| spec:
dnsConfig:
nameservers:
- 1.2.3.4
searches:
- my.dns.search.suffix
options:
- name: ndots
value: "2"
|
使用主机的IPC命名空间
设置hostIPC参数为True, 使用主机的IPC命名空间,默认为False
使用主机的网络命名空间
设置hostNetwork参数为True, 使用主机的网络命名空间,默认为False
使用主机的PID空间
设置hostPID参数为True, 使用主机的PID命名空间,默认为False
POD几种常见的状态
- Pending 挂起
- Running Pod所有容器已创建,且至少一个容器正处于运行状态、正在启动状态或重启状态
- Succeeded Pod所有容器都执行成功后推出,并且没有处于重启的容器
- Failed Pod至少一个容器推出为失败
- Unknown kubelet故障,无法获得Pod状态
Pod重启策略(RestartPolicy)
支持三种RestartPolicy
- Always 只要退出就重启 (默认)
- OnFailure 失败退出(exit code不为0)才重启
- Never 退出后不再重启
健康检查(三种探针)
https://juejin.cn/post/7163135179177852936
为了探测容器状态,k8s提供了两种探针:
- LivenessProbe 存活性探针, 如果不正常就删除容器,再根据Pod重启策略作响应动作。
- ReadinessProbe 就绪性探针,如果检测失败,将Pod的IP:Port从对应endpoint列表中删除。这种机制防止流量转发到不可用Pod上
- StartupProbe 如果应用本身启动时间过长,LivenessProbe和ReadinessProbe可能会检测失败,导致容器不停地重启。 StartupProbe探针只是在容器启动后按照配置满足一次后,不在进行后续的探测。
如果三个探针同时存在,先执行StartupProbe,禁用其他两个探针。直到满足StartupProbe,再启动其他两个探针。
LivenessProbe和ReadinessProbe支持如下三种探测方法
- ExecAction 容器中指定的命令,退出码为0表示探测成功。
- HTTPGetAction 通过HTTP GET请求容器,如果HTTP响应码【200,400),认为容器健康。
- TCPSocketAction 通过容器的IP地址和端口号执行TCP检查。如果建立TCP链接,则表明容器健康。
可以给探针配置可选字段,用来更精确控制Liveness和Readiness两种探针行为
- initialDelaySeconds: 容器启动后等待多少秒后探针才开始工作,默认是0秒
- periodSeconds: 执行探测的时间间隔,默认为10秒
- timeoutSeconds: 探针执行检测请求后,等待响应的超时时间,默认为1秒
- failureThreshold: 探测失败的重试次数,重试一定次数后认为失败。
- successThreshold: 探针在失败后,被视为成功的最小连续成功数。默认值是 1。 存活和启动探测的这个值必须是 1。最小值是 1。
容器生命周期钩子
容器生命周期钩子(Container Lifecycle Hooks)监听容器生命周期的特定事件
- postStart 容器启动后执行,这里是异步执行,无法保证一定在ENTRYPOINT之后运行。 如果失败,容器会被删除,根据RestartPolicy决定是否重启
- preStop 容器停止前执行,用于资源清理
钩子函数回调支持两种方式
- exec 容器内执行命令
- httpGet: 向指定URL发起GET请求
使用能力机制(Capabilities)
例如:可以给容器增加CAP_NET_ADMIN,根据需要添加或删除网卡
K8s负载均衡有如下几种机制
- service
- ingress Controller
- Service Load Balancer
Service是对一组提供相同功能的Pods抽象,并为他们提供一个统一的入口。实现服务发现和负载均衡功能
Service有四种类型:
- ClusterIP 默认类型,自动分配一个仅cluster内部可以访问的虚拟IP
- NodePort 在ClusterIP基础上,为Service在每台机器上绑定一个端口,这样就可以通过:NodePort来访问服务
- LoadBalancer
- ExternalName
Service的定义
Service通过yaml, 例如:定义一个nginx服务,将服务80端口转发到default namespace中带有标签run=nginx的Pod的80端口
1
2
3
4
5
6
7
8
9
10
11
12
13
14
15
16
| apiVersion: v1
kind: Service
metadata:
name: nginx
namespace: default
labels:
run: nginx
spec:
type: ClusterIP
selector:
run: nginx
ports:
- name: nginx
protocol: TCP
port: 80
targetPort: 80
|
保留源IP
各种类型的Service对源IP处理方法不同:
- clusterIP Service: 使用iptables模式
- NodePort Service: 源IP会做SNAT
Ingress controller
Service只支持4层负载均衡,没有7层功能。 Ingress可以解决这个问题
k8s存储卷
容器数据是非持久化的,容器消亡后数据跟着丢失,所以Docker提供volume机制将数据持久化存储
类似的,k8s提供了更强大的Volume机制和丰富插件,解决了容器数据持久化和容器间共享数据的问题
与Docker不同,k8s volume生命周期与Pod绑定
Pod删除时。 volume才会清理,数据是否丢失取决于Volume类型。例如PV数据不会丢,emptyDir会丢失
Persistent Volume
PV提供网络存储资源,而PVC请求存储资源
Volume生命周期:
- Provisioning
- Binding
- Using
- Releasing
- Reclaiming
Volume状态:
- Avaliable 可用
- Bound 已分配给PVC
- Released PVC解绑但未执行回收策略
- Failed 发生错误
Deployment
为Pod提供了一个声明式定义的方法,应用场景方法:
- 滚动升级和回滚应用
- 扩容和缩容
- 暂停和继续Deployment
扩容
1
| kubectl scale deployment nginx-deployment --replicas 10
|
回滚
1
| kubectl rollout undo deployment/nginx-deployment
|
滚动更新(rollout)
只有Deployment的pod template中的label更新,或者镜像更改时被触发。
其他更新,例如扩容Deployment不会触发rollout.
滚动更新的示例: nginx:1.9.1代替nginx:1.7.9
1
2
| kubectl set image deployment/nginx-deployment nginx=nginx=1.9.1
Deployment "nginx-deployment" image updated
|
查看rollout状态,执行
1
| kubectl rollout status deployment/nginx-deployment
|
回滚deployment(rollback)
1
| kubectl rollout history deployment/nginx-deployment
|
回退到历史版本
1
| kubectl rollout undo deployment/nginx-deployment
|
也可以使用–to-revision参数指定某个历史版本
1
| kubectl rollout undo deployment/nginx-deployment --to-revision=2
|
比例扩容
Secret
举例: 创建tls的secret
StatefulSet
有状态服务
- 稳定持久化存储,Pod重新调度后还是能访问到相同持久化数据
- 稳定网络标志, Pod重新调度后PodName和HostName不变
- 有序部署,有序扩展( 从0到N-1, 下一个Pod运行前,所有之前的Pod必须是Running和Ready状态)
StatefulSet中每个Pod的DNS格式为statefulSetName-{0..N-1}.serviceName.namespace.svc.cluster.local
DaemonSet
DaemonSet保证在每个Node上都运行一个容器副本,常用于部署一些集群的日志,监控,或者其他系统管理应用,典型应用包括:
- 日志收集, 比如fluentd, logstash
- 系统监控, 比如Prometheus
- 系统程序, 比如kube-proxy, kube-dns, glusterd, ceph
Resource Quotas
资源配额(Resource Quotas)是用来限制用户资源用量的一种机制
它的工作原理:
- 资源配额应用在Namespace上, 并且每个Namespace最多只能有一个ResourceQuota对象
- 开启计算资源配额后,创建容器时必须配置计算资源请求或限制
- 用户超额后禁止创建新的资源
资源配合类型
- 计算资源, CPU和memory
- 存储资源, 包括存储资源总量以及指定storage class的总量
- 对象数, 即可创建的对象的个数
- pods, rc, configmaps, secrets
- resourcequotas, persistentvolumeclaims
- services, services.loadbalancers, services.nodeports
默认情况, k8s所有容器没有任何CPU和内存限制, LimitRange可以用来给Namespace增加一个资源限制,包括最小、最大、默认资源
Pod隔离
使用标签选择器控制Pod之间流量
允许前端Pod访问后端Pod的XX端口, 允许后端Pod访问数据库的XX端口
ingress
internet -> ingress -> services
configmap
保存配置数据的键值对, 处理不包含敏感信息的字符串
三种使用方式:
- 设置环境变量
- 设置容器命令行参数
- 在Volume中直接挂载文件或目录
Finalizer
用于实现控制器的异步预测删除钩子,可以通过metadata.finalizers指定finalizer
etcd
CoreOS基于Raft开发的分布式key-value存储
- 基本的key-value存储
- 监听机制
- key的过期和续约机制,用于监控和服务发现
- 原子CAS和CAD,用于分布式锁和leader选举
API Server
k8s最核心组件之一,提供如下功能:
- 提供集群功能的REST API接口,包括认证,授权,准入控制,以及集群状态变更等
- 提供其他模块之间的数据交互和通信的枢纽
![apiserver.png]()
kube-scheduler
负责分配调度Pod到集群内的节点上,监听kube-apiserver,查询未分配Node的Pod,然后根据调度策略为Pod分配节点
指定Node节点调度
- nodeSelector 只调度到匹配指定label的Node上
- nodeAffinity 功能更丰富的Node选择器,比如支持集合操作
- podAffinity 调度到满足条件的Pod所在的Node上
例如, 给Node打标签:
1
| kubectl label nodes node-01 disktype=ssd
|
Taints和tolerations
用于保证Pod不被调度到不合适的Node上,Taint应用于Node, toleration用于Pod上
例: 使用taint命令给node1添加taints
1
2
| kubectl taint nodes node1 key1=value1:NoSchedule
kubectl taint nodes node1 key1=value2:NoExecute
|
目前支持的taint类型
- Noschedule 新的Pod不调度到该Node上, 不影响正在运行的Pod
- PreferNoSchedule: soft版的NoSchedule,尽量不调度到该Node\
- NoExecute: 新的Pod不调度到该Node上, 并且删除evict已在运行的Pod
Controller manager
通过apiserver监控整个集群状态,确保集群处于预期的工作状态
kubelet
每个节点上运行一个kubelet服务进程,默认监听10250端口,接受并执行主节点发来的指令,管理Pod和容器
![kubelet.png]()
容器运行时
![cri.png]()
kube-proxy
监听API server中service和endpoint变化,通过iptables为服务配置负载均衡
iptables性能问题(服务多的时候,iptables规则可能上万,大规模会有性能问题)
还有ipvs的方案
1
2
3
4
5
6
7
8
9
10
11
12
13
14
15
16
17
18
19
| -A KUBE-MARK-DROP -j MARK --set-xmark 0x8000/0x8000
-A KUBE-MARK-MASQ -j MARK --set-xmark 0x4000/0x4000
-A KUBE-POSTROUTING -m comment --comment "kubernetes service traffic
requiring SNAT" -m mark --mark 0x4000/0x4000 -j MASQUERADE
-A KUBE-SEP-55QZ6T7MF3AHPOOB -s 10.244.1.6/32 -m comment --comment "d
efault/http:" -j KUBE-MARK-MASQ
-A KUBE-SEP-55QZ6T7MF3AHPOOB -p tcp -m comment --comment "default/htt
p:" -m tcp -j DNAT --to-destination 10.244.1.6:80
-A KUBE-SEP-KJZJRL2KRWMXNR3J -s 10.244.1.5/32 -m comment --comment "d
efault/http:" -j KUBE-MARK-MASQ
-A KUBE-SEP-KJZJRL2KRWMXNR3J -p tcp -m comment --comment "default/htt
p:" -m tcp -j DNAT --to-destination 10.244.1.5:80
-A KUBE-SERVICES -d 10.101.85.234/32 -p tcp -m comment --comment "def
ault/http: cluster IP" -m tcp --dport 80 -j KUBE-SVC-7IMAZDGB2ONQNK4Z
-A KUBE-SVC-7IMAZDGB2ONQNK4Z -m comment --comment "default/http:" -m
statistic --mode random --probability 0.50000000000 -j KUBE-SEP-KJZJR
L2KRWMXNR3J
-A KUBE-SVC-7IMAZDGB2ONQNK4Z -m comment --comment "default/http:" -j
KUBE-SEP-55QZ6T7MF3AHPOOB
|
kube-proxy仅支持TCP和UDP
kube-dns
为k8s集群提供命名服务, 一般通过Addon方式部署,从v1.3版本开始,成为一个内建的自启动服务
源码: https://github.com/kubernetes/dns
kubectl命令行工具
kubernetes网络
- 每个Pod都有一个独立的IP,Pod内所有容器共享一个网络命名空间
- 集群内所有Pod都在一个直接连通的扁平网络中,可通过IP直接访问
- Service cluster IP可在集群内部访问,外部请求需要通过NodePort, LoadBalance或Ingress访问
Host network
最简单的网络模型就是让容器共享Host的network namespace,使用宿主机的网络协议栈。
优点:
- 简单,无需任何额外配置
- 高校,没有NAT等额外开销
缺点:
- 没有任何的网络隔离
- 可能与Host的其他端口号冲突
- 容器内做网络配置,可能影响宿主机
Calico
一个基于BGP的纯三层的数据中心网络方案(不需要Overlay)
Calico在每一个计算节点利用Linux Kernel实现一个高校的vRouter来负责数据转发,
每个vRouter通过BGP协议负责把自己运行workload路由信息像整个Calico网络内传播
CNI (Container Network Interface)
基本思想: Container Runtime在创建容器时,先创建好network namespace,然后调用CNI插件为这个netns配置网络,其后再启动容器内的进程
bridge
IPVLAN
从一个主机接口虚拟出多个虚拟网络接口, 所有接口有相同的MAC地址,不同的IP地址
1
| ip link add link <master-dev> <slave-dev> type ipvlan mode { L2 | L3 }
|
MACVLAN
MACVLAN可以从一个主机接口虚拟出多个macvtap,且每个macvtap设备都有不同的mac地址
1
| ip link add link <master-dev> name macvtap0 type macvtap
|
面试题:
- 简述k8s, Docker, minikube
- 简述k8s常见部署方式
- 简述k8s集群管理
- 简述k8s优势
- 简述k8s相关概念 Master,Node,Pod,Label,Deployment,Service,Volume,Namespace
- 简述k8s集群相关组件 kube-proxy iptables,ipvs原理
- 简述k8s创建一个Pod流程
- 简述k8s中Pod的重启策略
- 简述k8s中Pod的健康检查方式 https://kubernetes.io/docs/tasks/configure-pod-container/configure-liveness-readiness-startup-probes/
- 简述k8s中Pod的常见调度方式
- 简述k8s Pod生命周期
- 删除一个Pod过程
- 简述k8s deployment升级流程,和升级策略
- 简述DaemonSet
- 简述k8s自动扩容机制
- 什么是k8s的service,解决什么问题
- 简述k8s Service类型(ClusterIP, NodePort, LoadBalancer)
- 简述k8s service分发后端策略(RoundRobin,SessionAffinity)
- 如何从k8s外部访问集群内服务?
- 简述Ingress机制
- k8s镜像下载策略
- 简述k8s各模块如何与APIServer通信
- k8s scheduler
- k8s kubelet
- k8s哪些机制保持安全性
- k8s secret作用(私密数据, Tokens, SSH keys)
- k8s 网络模型?
- k8s calico原理?
- k8s 数据持久化方式?
- k8s PV和PVC, PV生命周期
- k8s worker系欸但加入集群过程
- 容器和主机部署应用的区别
- k8s 标签和标签选择器有什么用?
- etcd特点和应用场景


